
Mary Berry’s easy Victoria sandwich
326 ratings
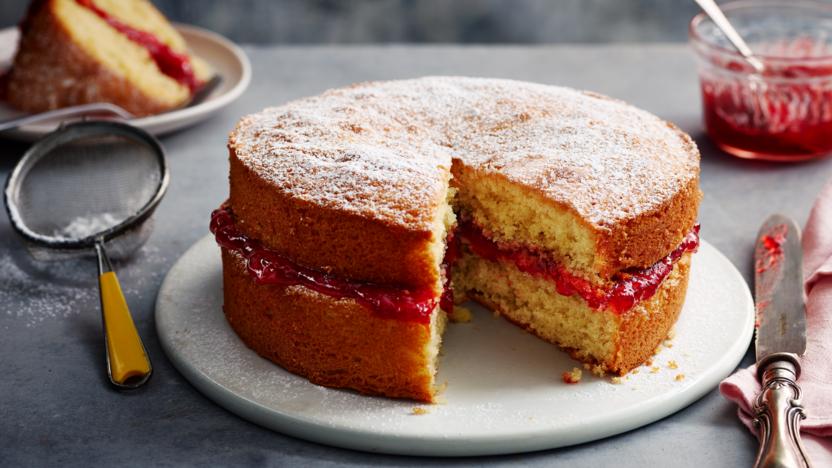
Mary Berry’s easy Victoria sponge cake recipe is a baking classic and a tasty tea-time treat.
Each serving provides 501 kcal, 5g protein, 50g carbohydrates (of which 36g sugars), 31g fat (of which 19g saturates), 0.8g fibre and 0.8g salt (serving with 300g of jam and 300ml cream).
Preparation time
less than 30 mins
Cooking time
10 to 30 mins
Serves
Serves 12
Dietary
Ingredients
- 4 free-range eggs
- 225g/8oz caster sugar, plus a little extra for dusting the finished cake
- 225g/8oz self-raising flour
- 2 tsp baking powder
- 225g/8oz butter at room temperature, plus a little extra to grease the tins
To serve
- good-quality strawberry or raspberry jam
- whipped double cream (optional)
Method
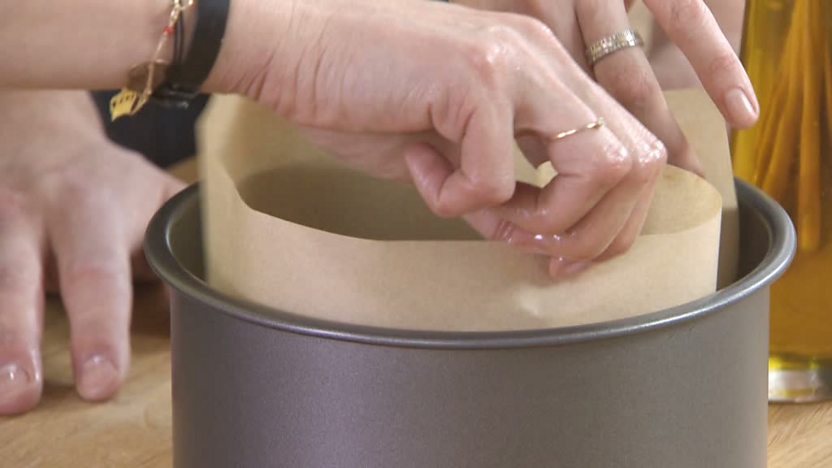
- Preheat the oven to 180C/160C Fan/Gas 4. Grease and line two 20cm/8in sandwich tins.
- Break the eggs into a large mixing bowl, then add the sugar, flour, baking powder and butter. Mix together until well combined with an electric hand mixer (you can also use a wooden spoon), but be careful not to over mix. Put a damp cloth under your bowl when you’re mixing to stop it moving around. The finished mixture should fall off a spoon easily.
- Divide the mixture evenly between the tins: this doesn’t need to be exact, but you can weigh the filled tins if you want to check. Use a spatula to remove all of the mixture from the bowl and gently smooth the surface of the cakes.
- Bake the cakes on the middle shelf of the oven for 25 minutes. Check them after 20 minutes. The cakes are done when they’re golden-brown and coming away from the edge of the tins. Press them gently to check – they should be springy to the touch. Set aside to cool in their tins for 5 minutes. Run a palette or rounded butter knife around the inside edge of the tins and carefully turn the cakes out onto a cooling rack.
- To assemble the cake, place one cake upside down onto a plate and spread it with plenty of jam. If you want to, you can spread over whipped cream too.
- Top with the second cake, top-side up. Sprinkle over the caster sugar.
Recipe Tips
To freeze the cakes: Allow the cakes to cool completely, then wrap each cake well in clingfilm or freezer bags. Freeze for up to 6 months. Allow to defrost thoroughly before filling.
To take your cakes out of the tins without leaving a wire rack mark on the top, put the clean tea towel over the tin, put your hand onto the tea towel and turn the tin upside-down. The cakes should come out onto your hand and the tea towel – then you can turn them from your hand onto the wire rack. Set aside to cool completely.
How-to videos

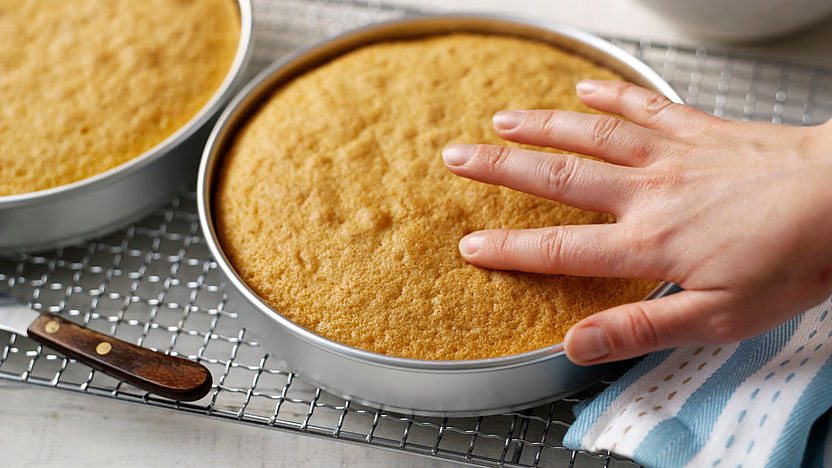
Testing to see if a cake is cooked


here are a few dressings that I think everyone should be able to make at home, and balsamic vinaigrette is at the top of that list! It’s so perfect for salads, and it’s really really easy to make too. Other dressings that I always make at home are ranch dressing, the classic Caesar salad dressing, and Cafe Rio’s Cilantro Ranch. There is nothing better than a fresh dressing to go with your next dish.
Store-bought dressing has added preservatives and sugars. They often use lower-quality oils and additional ingredients that aren’t needed. This balsamic dressing has only the basic high quality ingredients that make this dressing the best one you’ll ever have. Even my kids love this homemade salad dressing. I know how much we all want our kids to be eating more vegetables. This dressing is a great way to get those kids gobbling up whatever you pour it over.
Ingredients
This balsamic vinaigrette dressing recipe is simple and down to the basics. It’s great served over vegetables and especially with pork. I love dipping our pork chops in this dressing, it adds so much flavor. As you can imagine, it’s also amazing on tomatoes. You can find the measurements below in the recipe card.
- Balsamic Vinegar: This ingredient tastes amazing on it’s own. Blended with the rest of the ingredients it’s absolutely divine.
- Honey: This is to balance the acid in the vinegar. You could use maple syrup instead if you wanted to.
- Dijon Mustard: This adds a lot of flavor and a little spice.
- Garlic Powder: This is optional, but it adds a lot of savory flavors.
- Onion Powder: I like adding this to deepen the flavors.
- Extra-Virgin Olive Oil: This is the best tasting oil. You could use avocado oil instead.
- Salt and Pepper: This is to bring out all of the amazing flavors. I like using Kosher salt and freshly cracked black pepper.

Easy Zucchini Pickles For Long-Term Storage
By: Author Cheryl Magyar
Posted on August 19, 2020
9545shares

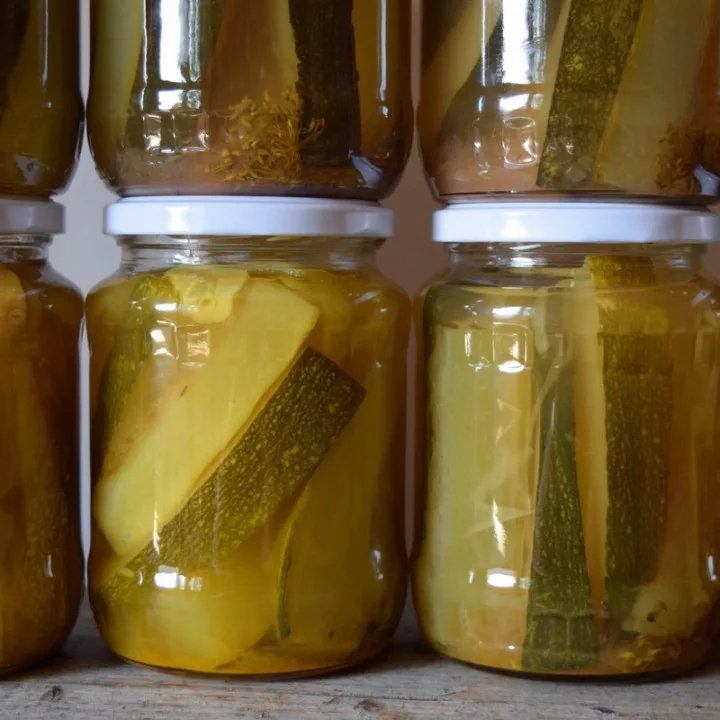
Zucchini pickles next to dilly beans – the brine is the same, giving you good reason to preserve two garden crops at once!
Zucchini has a tendency to just grow and grow (as long as you don’t make these growing mistakes!), often leaving you with the feeling that there is no end in sight. As soon as you harvest one, you lift the next leaf and spot another.
Yet another enormous zucchini to add to the growing pile…
It is one thing to pick a young and tender zucchini fresh from the garden for a breakfast scramble, but what is one person, even an entire family, supposed to do with several pounds of mature zucchini – harvested all at once?
We’ve already covered 14 ways to preserve a glut of zucchini which will have you freezing, dehydrating and canning your crop of zucchini in no time at all. That is a wonderful starting point for zucchini inspiration.
Today, however, we are discussing pickles. Not just any kind of refrigerator zucchini pickles that seem to be popular and/or trending.
We are talking about the zucchini pickles that last not 2 weeks, but up to a year or more in your pantry or your cupboard.
More and more homemade food. That was a subtle suggestion to keep on canning your own harvests. While you are at it, be sure to learn how to save your garden seeds too.
A few wisdoms about zucchini
One morning we harvested more than 40 pounds of zucchini in a matter of minutes.
See, the thing is, if you leave them on the vine, they will keep growing to enormous proportions. As long as there is sufficient rain (or irrigation) and cool weather, they will be joyously happy.

It may look cool to harvest some big green beauties, at the same time making you feel like a seasoned gardener, but the truth in eating and preserving them lies somewhere in between.
Smaller zucchini is always best for fresh eating while the skin is thin and tender.
Medium sized zucchini is best for frying, breading or baking stuffed zucchini boats.
You might already be asking yourself, is it okay to eat the zucchini skin?
Of course it is! So long as you rinse the zucchini before cutting into it, it is perfectly safe and incredibly tasty to enjoy.
The only thing to remember is to sample it first. If the zucchini is older and the skin feels too hard, resists pressure from your fingernail, or cracks slightly when cut, then simply peel it before cooking. In the case of zucchini boats, however, it becomes the vessel for saving all your toppings. Go ahead and scrape down to the bottom to finish it off, then throw the zucchini skins on the compost.
Which brings us to another question: can you eat zucchini raw?
This can only be met with another resounding yes.
Raw zucchini is mild and slightly sweet with a tinge of bitterness.
Eat it in salads with cheese, lemon and olives, toss it over your cooked pasta, or make spiralized pasta with it. There is almost nothing a zucchini cannot do.
Outside of quick preservation methods and yes, chocolate zucchini bread, let’s go over briefly why you may want to make pickles with your abundance of zucchini instead.
By the way, the oldest, hardest zucchini are also useful, they are best for making zucchini relish and for saving seeds.
6 reasons to make zucchini pickles
Not every summer do we get the chance to preserve dill pickle slices and spears. They either fail to thrive in our often wet and mountainous climate, or the quality from the market is subpar. They are a luxury – and it is sometimes hard to preserve them as crisp as store-bought pickles.
Given the fact that cucumbers do not grow well under stress (who does?) they can even become bitter in drought. All the while, your zucchini may survive and be delightfully edible. That is reason number one for making pickles with zucchini, rather than cucumbers.
- zucchini is hardier than other vegetables, making it a number one choice for pickling
- a little bit goes a long way! (one large zucchini can fill 2-3 jars)
- zucchini preserves well with the right brine ratio
- it goes well with several spices, including dill, caraway, cumin, garlic, turmeric, coriander, black or cayenne pepper
- no part of the zucchini needs to go to waste
- one can never have too many pickles in their pantry, only too many jars of jam…
If you are into the act of eating from blossom-to-stem (nose-to-tail, so to speak, in the animal realm) know that zucchini has lots to offer in terms of its age and variety.

Simply scoop out the seeds (eating them up in a breakfast scramble) and use the outer rind, with or without the skin, for making zucchini pickles.
The older zucchini gets, the harder the skin becomes. At the same time, the seeds continue to develop inside. And yes, you can eat those zucchini seeds too! When young, they are delicate and tender. A joy to bite into. As they age, they become hard and a little less appealing to chomp on. If they have reached that stage, do not add them to your pickles. Scoop them out as you prepare your zucchini for canning.
Zucchini pickles ingredients
Preparation time: 30 minutes
Cooking time: 15 minutes
Yields: approximately 8 pints (will vary depending on size and how you cut your zucchini)
Difficulty: easy

Here it is, the list of ingredients you’ve been waiting for, so you can get started on your own batch of zucchini pickles:
- 3-4 pounds zucchini, cut into spears, slices or chunks
- 3 onions, thinly sliced
- 4 cups apple cider vinegar
- 4 cups water
- 1/2 cup salt
- fresh dill flowers (one per jar) or 2 tsp. dill seeds
- 1 head of garlic – or as many cloves as you like
- optional spices – 1.5 tsp. black peppercorns, 1.5 tsp. mustard seeds, 1 tsp. turmeric
Don’t forget that you can also add your favorite spices such as coriander seeds, a generous dash of cayenne pepper or red pepper flakes – just think about proportions. You don’t want to make these vinegary pickles overly spicy.
You can, however, also add some sweetness to your zucchini pickles if you crave your pickles that way. Anywhere from 1/2 cup to 1 cup of sugar added to the brine should give you the flavor profile you are looking for.
Zucchini pickles: step-by step canning instructions
Not only is this zucchini recipe delicious, it also happens to be super easy too. If you are new to canning, you will want to try this as you grow your food preservation skills with new recipes.
Step 1: Sterilize your jars
Cleanliness is the key to success. Use hot water to wash your jars and let them air dry. Do not wipe dry them with a towel, as this can leave fuzzes as well as bacteria from your dishcloth. Once you’ve done this, be sure to set up your water bath canner, as it doesn’t take long to prepare the zucchini.
Step 2: Making the brine
In a large pot, bring the apple cider vinegar, water and salt to a boil, then bring it to a very gentle simmer. At the same time begin to prepare your zucchini.

Step 3: Preparing the onions, garlic and zucchini for pickles
Before getting started on your zucchini, clean your garlic and chop up your onions first.

Wash your zucchini well, as it is perfectly acceptable, even encouraged, to make pickles with the skin on.

One thing to consider, and perhaps something you have never heard before, is that slightly older zucchinis are perfect for making pickles. Once the flesh has just started to harden and there is something to bite into – leaving you with a crunchy, not mushy, pickle.
Plus, more mature zucchinis make hot packing your jars easier, as there is something to “fork” into.
At this point, you need to decide how you like your pickles: spears, rounds, thin slices, etc. If you are making spears, be sure that they are uniform and that they can stand in the jars without bending.

A bowlful of zucchini slices, destined to become pickles.
Quickly, and mindfully, chop those up and get ready for the next step.
Step 4: Hot-pack pickles – adding everything to the pot
The biggest difference between hot pack and cold pack canning is that hot-pack canning removes air from the fruits or vegetables that you are preserving, which in turn shrinks the food. At the same time, it prevents the contents from floating in the jar.
It is our preferred method of canning, because in our experience it not only looks better, it tastes better too. It improves the shelf life of whatever you are canning and it increases the amount you can fit into each jar – in the case of canning zucchini, you will need all the space you can get!
With your brine simmering on the stove, add the onions and garlic. Let it cook for about 10 minutes to soften.
Then add the cut zucchini and bring everything back to a boil. Let it cook for 5-10 minutes until it is heated through.
Step 5: Filling the jars
Add dill to each jar and other optional spices, if using.

Tip: It is far easier to add a small amount of turmeric to each jar, rather than adding it to the brine.

Packing the jars with hot zucchini wedges.
Pack the zucchini firmly into each jar, using the help of a fork and/or slotted spoon. Once your jars are full, ladle hot brine into jars, leaving a 1/2-inch headspace.

Fill the jars with brine, leaving 1/2 inch headspace.
Remove any bubbles with a wooden stick.
Step 6: Sealing the jars
Be sure to wipe any spills, taking special attention to wipe the rims of the jars before sealing. Apply your lids and rings, if using, as with canning any other recipe, then place the jars in a water bath for 10 minutes.
Remove the jars and set them on a kitchen towel to cool at their own pace.
Step 7: Check that jars have sealed and label them!
Before putting your beautiful jars of zucchini pickles directly on the shelf, make sure that all lids have sealed.
Give them a label – even if you are sure that you will remember what you pickled – and give them one last admiring look until winter comes around.
In the meantime, one can only assume that you still have lots of gigantic and fresh zucchini to sink your teeth into!
Happy zucchini feasting to each and every one of you with an enormous harvest. Don’t forget to share the zucchini love.
Easy Zucchini Pickles For Long-Term Storage
Yield: 8 pints
Prep Time: 30 minutes
Cook Time: 15 minutes
Total Time: 45 minutes
These crunchy zucchini pickles are so easy to make and will last for a year or more in your pantry.
Lemon custard tea cakes
- 30m prep
- 25m cook
- makes 12
You are watching
Taste_Lemon custard tea cakes_1080p_reshootRelated content
UP NEXT
Made in the muffin pan, these little cakes are stuffed with lemon curd custard for a sweet treat even Nanna…
8,311 people saved this
377 people made this
Made in the muffin pan, these little cakes are stuffed with lemon curd custard for a sweet treat even Nanna would approve of.
T
Tiffany Page, Food Director
Allergens: Recipe may contain gluten, wheat, egg, milk and lactose.
- 150g butter, chopped, at room temperature
- 1/2 cup caster sugar
- 1 tsp vanilla extract
- 2 eggs
- 200g (1 1/3 cups) self-raising flour
- 1/3 cup milk, at room temperature
- Icing sugar, to serve
- Lemon curd custard
- 1 1/2 tbsp custard powder
- 2 tsp caster sugar
- 3/4 cup milk
- 1/3 cup lemon curd
- Grated rind of 1 lemon
- Select all ingredients
- Step 1 To make the custard, place custard powder and sugar in a small saucepan. Add just enough milk to make a paste then add remaining milk. Slowly bring to the boil over medium heat, stirring constantly. Reduce heat and simmer for 2 minutes. Set aside to cool completely, stirring occasionally. Stir through lemon curd and rind. taste.com.au00:50How to make caster sugar at home UP NEXT
- Learn how to make caster sugar from scratch at home usign…
- Step 2 Preheat oven to 180C/160C fan forced. Grease a 12 x 1/2-cup-capacity muffin pan.
- Step 3 Use electric beaters to beat butter, sugar and vanilla in a bowl until pale and creamy. Add eggs, one at a time, beating well after each addition. Beat in flour and milk until well combined.
- Step 4 Spoon 1 tablespoon of mixture into each muffin hole, spreading slightly up the sides of the pan. Fill with 1 tablespoon of custard and top with another 1 tablespoon of batter, trying to encase the custard in batter. Repeat with remaining muffin holes.
- Step 5 Bake for 22 to 25 minutes, or until golden and puffed. Leave to cool for 5 minutes before turning onto a wire rack to cool. Serve dusted with icing sugar.
Did you make this?
377 people made this
8,311 people saved this
Image by Brett Stevens
